There are many ways of doing graphics in neuron. The simplest is
simply to put up graphics windows and graph directly onto them. If
one is running large simulations or lots of simulations this is
impractical for two reasons. You will not be able to graph everything
so you will have to rerun the sim if you want to see anything else.
Also the graphics will slow you down - lots of graphics will slow you
down a lot. The obvious alternative is to save the data as you go
along. Data can be saved to disk but then has to be reaccessed to
look at it graphically. Alternatively, data can be stored in memory
and then graphed or saved. This is most efficiently done using Zach
Mainen's vector package.
Grvec contains a set of routines for rapid and memory-efficient
storage, access and graphing of data. A variety of routines are used
but the basic steps are save, write, read and graph.
Saving uses the vec.record command. The data to be stored is listed
in a list called printlist. Each item in the printlist gives the
name of the variable being stored and the vector in which the data is
being stored. Items can be added to the printlist in 2 ways:
new printlist item("cell[0].soma.v(0.5)") will do the obvious
record(tmplist,"soma.v(0.5)") will take all the objects in tmplist
(perhaps a list of all cell[#]) and add their soma voltage to the
printlist
Graphing or saving can be done after a simulation has been done.
This is done from the vecpanel which is launched using the procedure
of the same name. The basic commands are all menu driven and quite
simple. Complexities in the package come primarily when one is
superimposing different simulations.
Saving and reading using grvec are highly efficient since fwrite and
fread commands are used to rapidly copy chunks of memory between RAM
and disk. For optimal speed grvec uses a nasty mixed file format with
both ascii and byte storage. This allows data to be picked up very
quickly with a seek and fread.
Reading saved files is now quite simple using the file chooser window
that comes up with the appropriate button. Since a major goal of the
package is to permit comparisons between different simulations, one
can read multiple files whose data can then be superimposed. In order
to implement this, each file is associated with a separate
attribute panel which is identified by a number.
Attribute panel #0 is always
the current simulation if there is one, which has not necessarily been
saved to disk. The attribute panel for a particular data set will
control things like line color and line type and permit you to do
global things like graph all of the data, rescale all the associated
graphs or remove all of the associated graphs.
There are also associated utility files: 1) parset.hoc assists with
parameter explorations 2) spkts.hoc calculates spike times,
instantaneous frequencies etc. 3) boxes.hoc allows you to graph rows
and columns in a tray, 4) utility files decvec.hoc and declist.hoc
declare utility routines. Basic routines from these ancillary files
are listed at bottom.
The basic commands for recording state variables is
"new_printlist_item" which adds a state variable name to the printlist
-- the list of state variables to be saved. An ancillary command is
"record" which is useful for storing many identical state variables
belonging to different objects (eg the soma voltage from each of the
many cells of a network).
cvode_local(1)
tstop = 100
begintemplate Cell
public soma
create soma
proc init() {
objref nrn[5]
objref stim[5]
for ii=0,4 nrn[ii]=new Cell()
access nrn[0].soma
for ii=0,4 nrn[ii].soma stim[ii]=new IClamp(0.5)
for ii=0,4 { stim[ii].dur=100 stim[ii].amp=0.1*(ii+1) }
proc parset () {
Bring up the #0 attribute file (see below) which defines how the
Remove an attribute panel from the list of them.
Show all the attribute panels with their associated filenames.
Create a new attribute panel initially not associated with any file.
The color is given by a number 0-9:
Line types are also numbered 0-9. The order of the lines can be
on/off switch to tell system that next plot (or set of plots)
The width (in pixels) of the graph on the screen. Use 'Set view' to
The height (in pixels) of the graph on the screen. Use 'Set view' to
How often values should be stored to vectors during simulation.
A string containing a filename to be read.
Sets the printlist. Records from all of the objects in 'list' with
Graph a particular vector that's in the printlist. They are
Like gv() but used for graphing vectors read from files. 'attrnum'
Read vector #INDEX from file associated with ATTRNUM into vector VEC.
Reads file in strdef 'filename' into attribute panel attrnum. The
Graph all the vectors or start with vec #min and go to through all or to #max.
flag 0: graph, flag 1: save all, flag 2: save inds (vec1) and times (vec)
Make a tray belonging to attrnum with 'cols' columns and 'rows' rows
Last updated: Aug 8, 2000 (9:2)
Comparing complex simulations: grvec.hoc (TOC)
Running a simulation (TOC)
Start up the basic control panel by typing "vecpanel()" from the
command line.
Most grvec routines can be accessed either from the command-line or
from the GUI. In general, run-time commands should be executed from
the command line while display commands are best accessed from the
GUI, consistent with keeping running view-free (and viewing run-free
as well). Initially, we will run and view from the same shell.
We will use the following code adapted from net1.hoc:
create soma
soma {
diam = 20
L = 20
insert hh
}
}
endtemplate Cell
To indicate what is to be saved to vectors:
printlist.remove_all // clear it out just in case
record(new List("Cell"),"soma.v(0.5)")
We could have done this from the GUI

Which allows us to assign particular variables to list using the usual interface
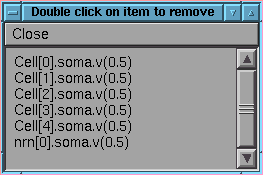
If we now do this we have a redundancy which can be removed by double click
Note the window header since the list browser is a common format
Can also add a single item from command line
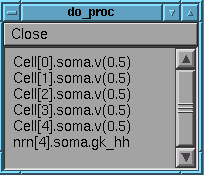
new_printlist_item("nrn[4].soma.gk_hh")
Now we run the simulation either from command line or GUI
run()
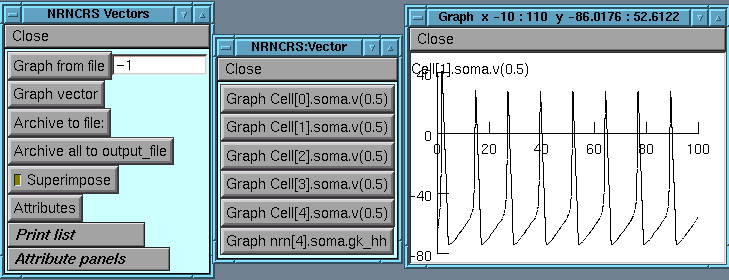
We can look at the results of the simulation:
(the printlist can be displayed as either a series of buttons or as a browser window)
Another useful panel is the Attributes panel which controls the attributes of the graphs

For example, we can alter line type and color and superimpose 1 graph on another


We can still handle the graph in the usual way
Or we put up multiple graphs
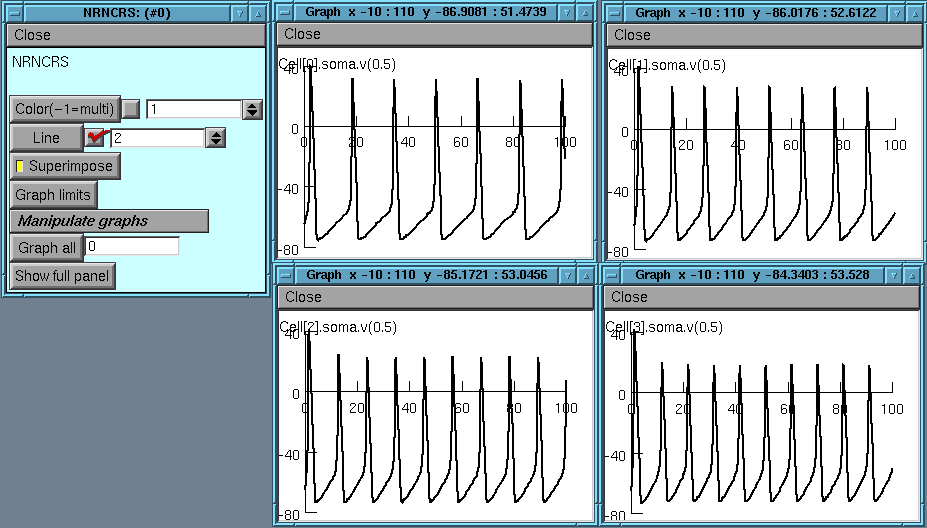
and handle all of them together: For example erasing all of them

Or setting all of them to put on text, or move text etc., or removing them all
Yet another panel is brought up by Graph limits button
Allows setting the x and y axis limits
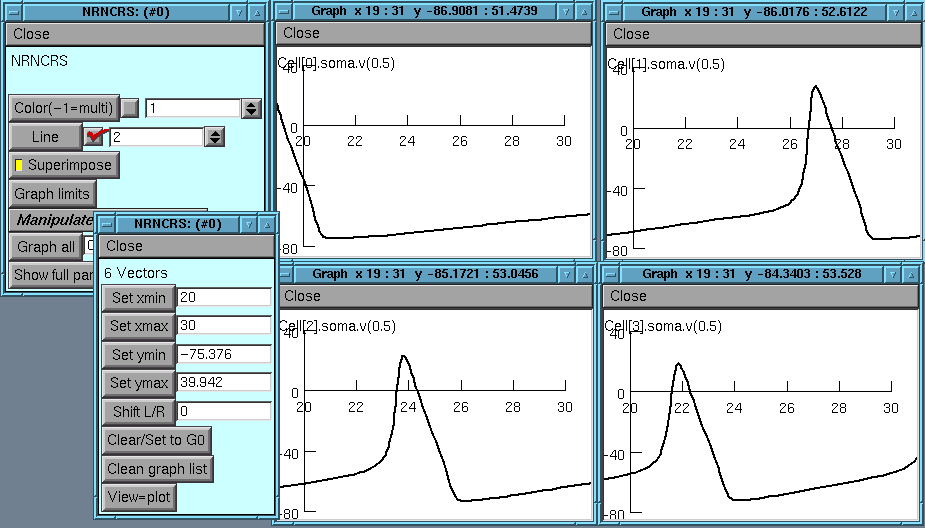
Can use the Shift button to scroll through the graphs

Going back to the main panel allows us to directly manipulate the vectors
For example can do vector.op and enter max:

then double click on item to get maximum values printed out on command line:
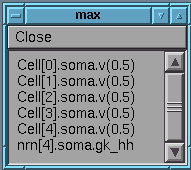
eg: Cell[0].soma.v(0.5).max = 39.942
nrn[4].soma.gk_hh.max = 0.0130783
if need to do several things to same vector easier to write a proc

Example proc would be
proc do_proc () {
printf("%s (printlist item #%d) maximum is
printf("%s (printlist item #%d) minimum is
printf("%s (printlist item #%d) average is
}
output is:
nrn[4].soma.gk_hh (printlist item #5) maximum is 0.0130783
nrn[4].soma.gk_hh (printlist item #5) minimum is 0.000366644
nrn[4].soma.gk_hh (printlist item #5) average is 0.00573398
Or simply hook a vector to pointer XO and handle from command line:
5 :XO -> nrn[4].soma.gk_hh
oc>XO.min
0.00036664446
Saving and loading simulations (TOC)
Single vectors can be saved using Archive to file:
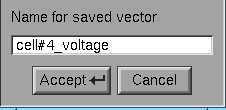
Printing Cell[4].soma.v(0.5) to data/v99jul28.01
Printing nrn[4].soma.gk_hh to data/v99jul28.01
** The entire simulation can be saved with Archive all to output file
Saving to data/v99jul28.02
Note that this will use the default names for saved vectors and that
it will augment the sequence number so as not to overwrite another
data file
This may be done from the command line using pvall()
Now we can read these files back in; perhaps in a different shell
using Graph from File which brings up a file browser


We can look at the data from this file in much the same way as was
done with the original simulation results. Click on Show full panel
to see a list of what is in the file:


To look at some more data we can either read a new file into that
attribute panel with Change file button at bottom or create a new
attribute panel for the new file. With multiple files associated with
different attribute panels, it's often useful to choose different line
colors to look at the different files' data; (WARNING: Change file
will not always update all old panels.)

Using trays (TOC)
If we want to look at all of the data from a file (or from the
printlist) push Graph all and they will all be put up. If there
are 10s or 100s of items this is inadvisable however since it will
put up graphs willy-nilly all over the screen. Note that if you do
this, Remove graphs will get rid of them all.
To graph a large number of graphs it is best to arrange them on a
tray. Like most commands, command mktray() is (minimally)
self-documenting when called with no arguments.
oc>mktray()
mktray(attrnum,rows,cols[,xsize,ysize,label])
Create a tray for attr panel ATTRNUM to superimpose upon.
The first required argument is the attribute panel number which
indicates which data file (or current simulation with #0) this tray
should be associated with. Note that the file needs to have already
been read into an attribute panel and that previous graphs should be
fully cleared from the list with Remove graphs.
Alternatively, mktrpanl() will put a panel that will
allow you to enter the arguments and will call mktray().
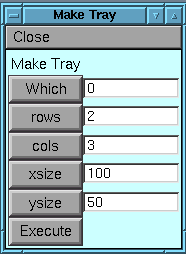
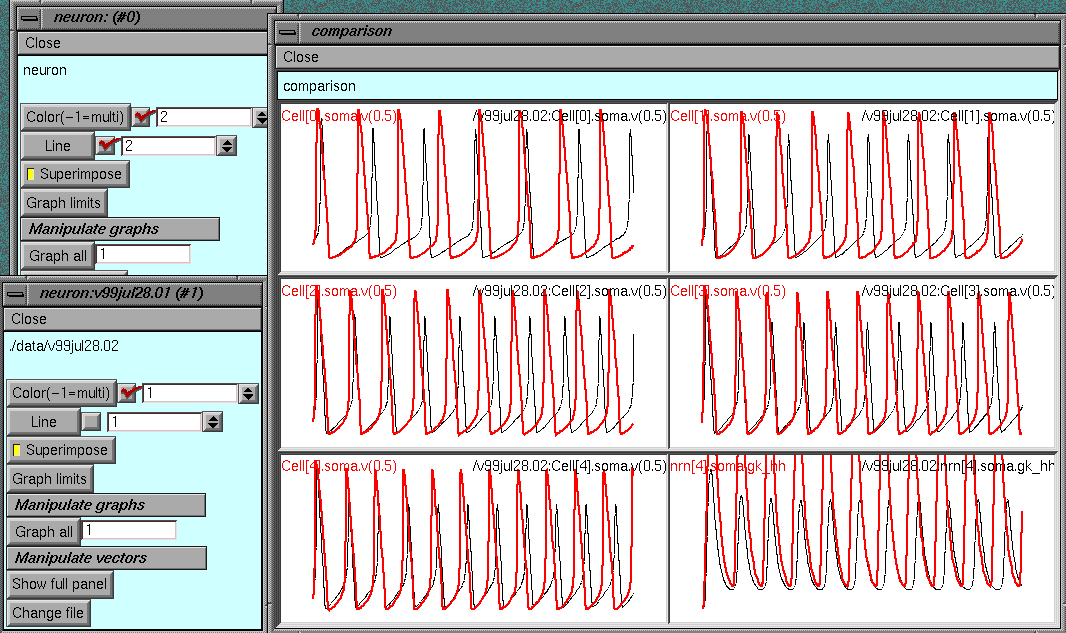
Let's put up a tray for attribute panel #2 for file v99jul28.02 with
its 6 graphs
mktray(2,3,2,200,100,"v99jul28.02:some nice graphs")
this provides an empty tray and sets the Superimpose flag in attribute panel #2
If we now hit Graph all we will fill the tray with the various traces
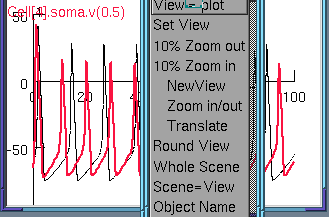
View=plot on the Graph limits panel to get everything centered
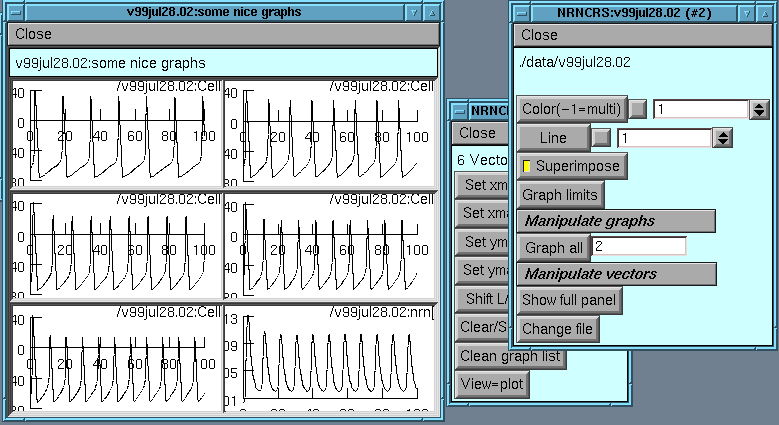
Can do all the same manipulations as before, such as shifting through the graphs

Can select Erase axes and New View and then pick out little
pieces of interest to look at

Comparing simulations (TOC)
Often run a very similar set of sims with only 1 change
previously used default gnabar_hh=0.12; now set
forsec "soma" gnabar_hh=0.5
Can display the previous simulation with the new one superimposed
on the same tray.
Evaluating multiple parameters (parset) (TOC)
Eventually all parameter exploration may be nicely automated with
genetic algorithms or gradient descent routines. For now, it's often
nice to just eyeball a lot of parameter space in an organized way.
the parameter setting is typically called from a routine:
objref nrn[5],stim[5]
nrn[0]=new Cell()
nrn[0].soma stim[0] = new IClamp(0.5)
printlist.remove_all // clear it out just in case
record(new List("Cell"),"soma.v(0.5)")
new_printlist_item("nrn[0].soma.gk_hh")
access nrn[0].soma
prsl.remove_all()
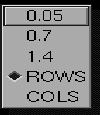
prsfor("LEAK","gl_hh",2e-4,1e-3,2e-4)
ob = new PRS("Na","gnabar_hh=",0.05,0.3,0.7,1.4)
ob = new PRS("Kdr","gkbar_hh=",0.03,0.06,0.3,0.6,2)
ob = new PRS("STIM","stim.amp=",0.2,0.5,1)
ob = new PRS("sleep wake","","sleep","bursting()","wake","regfiring()")
sims = setprs() // required!
}
parset()
Can run either in parallel (no advantage without a parallel
implementation) or in series
exerun()
For each parameter can choose a particular value or display as rows or cols


Can run massive numbers of parameters in this way and look at them as any pairs

grvec reference (TOC)
Contains GUI and hoc routines for managing and displaying vectors.
The major panels are vecpanel() and attribute panels.
vecpanel: 'vecpanel()'
Most of the functionality can be accessed by using the GUI. The
primary entry to the package is via command 'vecpanel()' which brings
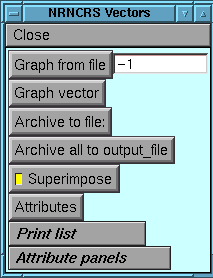
up a panel with the following entries:
Graph from file
Brings up a file chooser menu to read in a file that has been saved
from the vecpanel.
Graph vector
Brings up a list of entries from the printlist. Clicking on one of
these entries will graph the corresponding vector. Location of this
graphic may be governed by the attribute panel (viz.)
Vector to printer
Translate a single vector directly into postscript and send to the
printer (currently via lpt).
Archive to file
Archive a single vector to the output file. The output file name is
constructed in the form v96jan07.05 where the runnum used (5 in this
case) is actually the current runnum minus 1. This way the file
name will correspond to an index file comment that has just been
saved using sim-save-sim.
Archive all to file
Archive all the vectors to an output file. See entry above re
formation of the output filename.
New plot
Put a new blank graph up to superimpose vector graphics upon.
Attributes
printlist vectors will be graphed.
Erase
Erase the current graph. This will be the most recent one put up.
Print List
Commands pertaining to manipulation of the printlist. The printlist
is the list of variables being recorded.
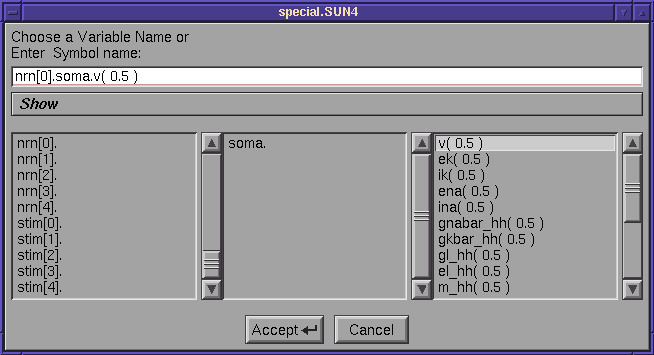
Add var to printlist
Brings up the symbol chooser panel that is used in Plot What.
Pick out something to be added to the printlist for storage.
Remove item from printlist
Double click on the item to take it off the printlist
Show printlist
Just look at the list of items.
Use string as suffix
Used with 'record()' or 'Add all obj's of this type to printlist'
Save printlist
Brings up a file chooser menu. A hoc 'proc' will be added to that
file (typically run.hoc) so that the current printlist will be
reloaded when that file is read in.
Clear printlist
Remove all the items from the printlist.
Add all obj's of this type to printlist
Pick out an object. All objects of this type are then added to the
printlist with a string from 'Use string as suffix' tacked on. For
example if your neurons are of type 'NEURON' and the string entered
were 'soma.v(0.5)' then all the voltages in the soma of these
neurons would be listed. See 'record()' below for more information:
this is probably more easily used with hoc code in the run.hoc file.
Attribute panels
Commands pertaining to manipulation of attribute panels. Attribute panels
determine how and where graphics will be presented.
Read file
Present file chooser to read file.
Remove
Show
Clear list
Remove all of the attribute panels.
New
Attribute panels
Attribute panels determine the attributes that will be used when
something is graphed. They permit things to be superimposed -
plotting on top of another plot to compare things.
Color(-1=multi)
(white,black,red,blue,green,orange,brown,purple,yellow,grey).
The order of the colors can be seen by putting up the 'Color/Brush'
panel from a graph window. -1 means to cycle through the colors
when putting up sequential graphs.
Line
seen by putting up the 'Color/Brush'.
Superimpose
should be superimposed on existing graph(s) rather than putting up a
new graphics window.
World and View
Allows setting of all graphs associated with this panel. 'World'
refers to the coordinates within the graph, while 'View' refers to
how big the graph is on the screen.
Set xmin ...
Each of these buttons can be used to set all of the graphs to start
or end abscissa or ordinate at the number given.
Set all worlds to G0
G0 is the first graph put up for this set. You can use 'Set view'
(or other command) from the graph window to reset the coordinates
for this window. Then pressing this button will set all of the
other graphs to this same coordinate system.
Clear world entries
Set xmin,xmax,ymin,ymax to 0.
Width
take effect.
Height
take effect.
Set view
Set all of the views of all associated graphs according to 'Width' and
'Height'
Graph all
Graph all of the vectors. If 'Superimpose' has not been set, this
will put up new windows for each one. If 'Superimpose' has been
set, the corresponding number will be taken to be the number of
another attribute panel and sequential vectors will be plotted on
top of sequential graphs related to that attribute panel. In this
way a full set of vectors from one simulation can be superimposed
upon those from another.
Label graphs
Puts labels on each graph.
Erase graphs
Erase all of the graphs.
Remove graphs
Removes all of the graphs belonging to this attribute panel.
Show full panel
Shows a list of all of the vectors belonging to this panel.
Selecting an individual vector will show a graph of that vector.
Change file
Read a different file into this attribute panel.
User variables
byte_store (default 0)
Determines whether a vector will be saved to a file as ascii
(byte_store=0) or in a binary format
(1:byte,2:short;3:float,4:double).
show_panel (default 1)
Determines whether the full panel showing all the vectors will come
up when reading in a new file.
printStep
filename
Hoc procedures
record(list,"string")
'string' appended. For example:
printStep=0.2 // record every 0.2 ms
tmplist = new List("NRN") // look at all objects created with 'new NRN()'
record(tmplist,"soma.v(0.5)") // record all of the soma voltages from these
gv(index)
numbered from 0 up.
rv(attrnum,index)
is the number of the attribute panel that this file has been read
into. This number can be read off the top of the attribute panel
itself. The index is the number of the vector, numbered up from 0.
rv_readvec(attrnum,index,vec)
read_vfile(attrnum)
following sequence is frequently useful:
for ii=0,dir.count-1 {
filename = dir.object(ii).s
read_vfile(1)
rv_readvec(1,3,vec) // read vector #3 into vec
do_something_with_vec(vec)
}
See 'dired()' below for how to make a list of files.
grall(attrnum[,min,max,remote,start_point])
If 'remote' is listed then superimpose will be set and graphs will be
superimposed on graphs already present (see mktray() below). If
'start_point' is listed then graphing will start at that graph#.
decvec.hoc routines (TOC)
listedit (list,str)
Puts up a browser for list where str is displayed where clicking on
any item will remove that item from the list.
savevec(vec)
put vec onto veclist
pushvec(vec,num)
put num at the end of vector
popvec(vec)
return the last num on vector and remove it from vector
spkts.hoc routines (TOC)
dired (list,file)
Make a list of file names; eg:
objref dir
dir = new List()
dired(dir,"data/v95nov27.0[1-5]") // put files 1-5 on the list
spkts(attrnum[,flag,min,max])
Look for spikes in voltage vectors. Goes through all vectors (or
min to max. Will graph time of spikes (x-axis) against vector
number (y-axis) or save this info (flag==2) into vec1 (indices) and vec (times)
or save as consecutive vectors in veclist (flag==1)
uses thresh (default 0 mV) as voltage threshold for deciding which are spikes
calcspkts (flag,index)
To be run after spkts(num,2): uses info contained in vec1 and vec to
print out information about times or frequencies:
1:spike times; 2:spike frequency; 3:burst times; 4:burst frequency
uses burst_maxfreq (default 30 Hz) to determine how slow a frequency
means a burst
spkhist ()
Display a histogram of spike occurrence times.
boxes.hoc routines (TOC)
mktray(attrnum,cols,rows[,width,height])
of graphs each of which is width x height (default 300x200) pixels in
size. Vectors can then be plotted onto these graphs by setting
'superimpose' to 1 and using 'Graph all' with a number equal to the
current panels number (or doing 'grall(num)' from the command line).
Using outvec (TOC)
Generally grvec stores the complete time course of a run in individual
vectors for each state variable chosen. If simulation duration is
long then these vectors will take a lot of memory. outvec == 'output
vector' allows the use of smaller vectors by dumping them at shorter
time intervals.
The following parameters are important for using outvec:
outvecint : interval between data dumps to file, this will determine the
length of the stored vectors
printStep : interval between data being written to the vector
byte_store: should not be set to 0 since ascii reads and writes are slow
The following routines need to be called to set up outvec:
outvec_init() in initMisc2() to set up the vectors
outvec_finish() in finishMisc() to put out any remaining data
outvecs() in outputData() for putting
Note that outvect gives the time of next outvec() dump; this point can also be conveniently used to print out the progress of the simulation